Tasks are the components that make up a project. Tasks can represent anything inherent to the project, they could range from a detailed work assignment to a passing idea. Tasks are organised into columns with each individual task organised automatically via the assigned task rank. The user is free to categorise the columns to suit their own needs. Each task holds its own information which can be accessed by clicking on the task.
It is important to remember that tasks behave differently depending on how the project is setup. If you want to assign time or costs to a task, then these options must be turned on in the project refer to the corresponding sections for more information (cost tracking is only available to Eclipse Pro users).
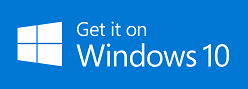
To add a task, click on “Add Task” in the column you would like to add it to. This will bring up the add task window for you to enter in the details. Tasks are automatically sorted inside their column based on priority, but can be drag and dropped into other columns.
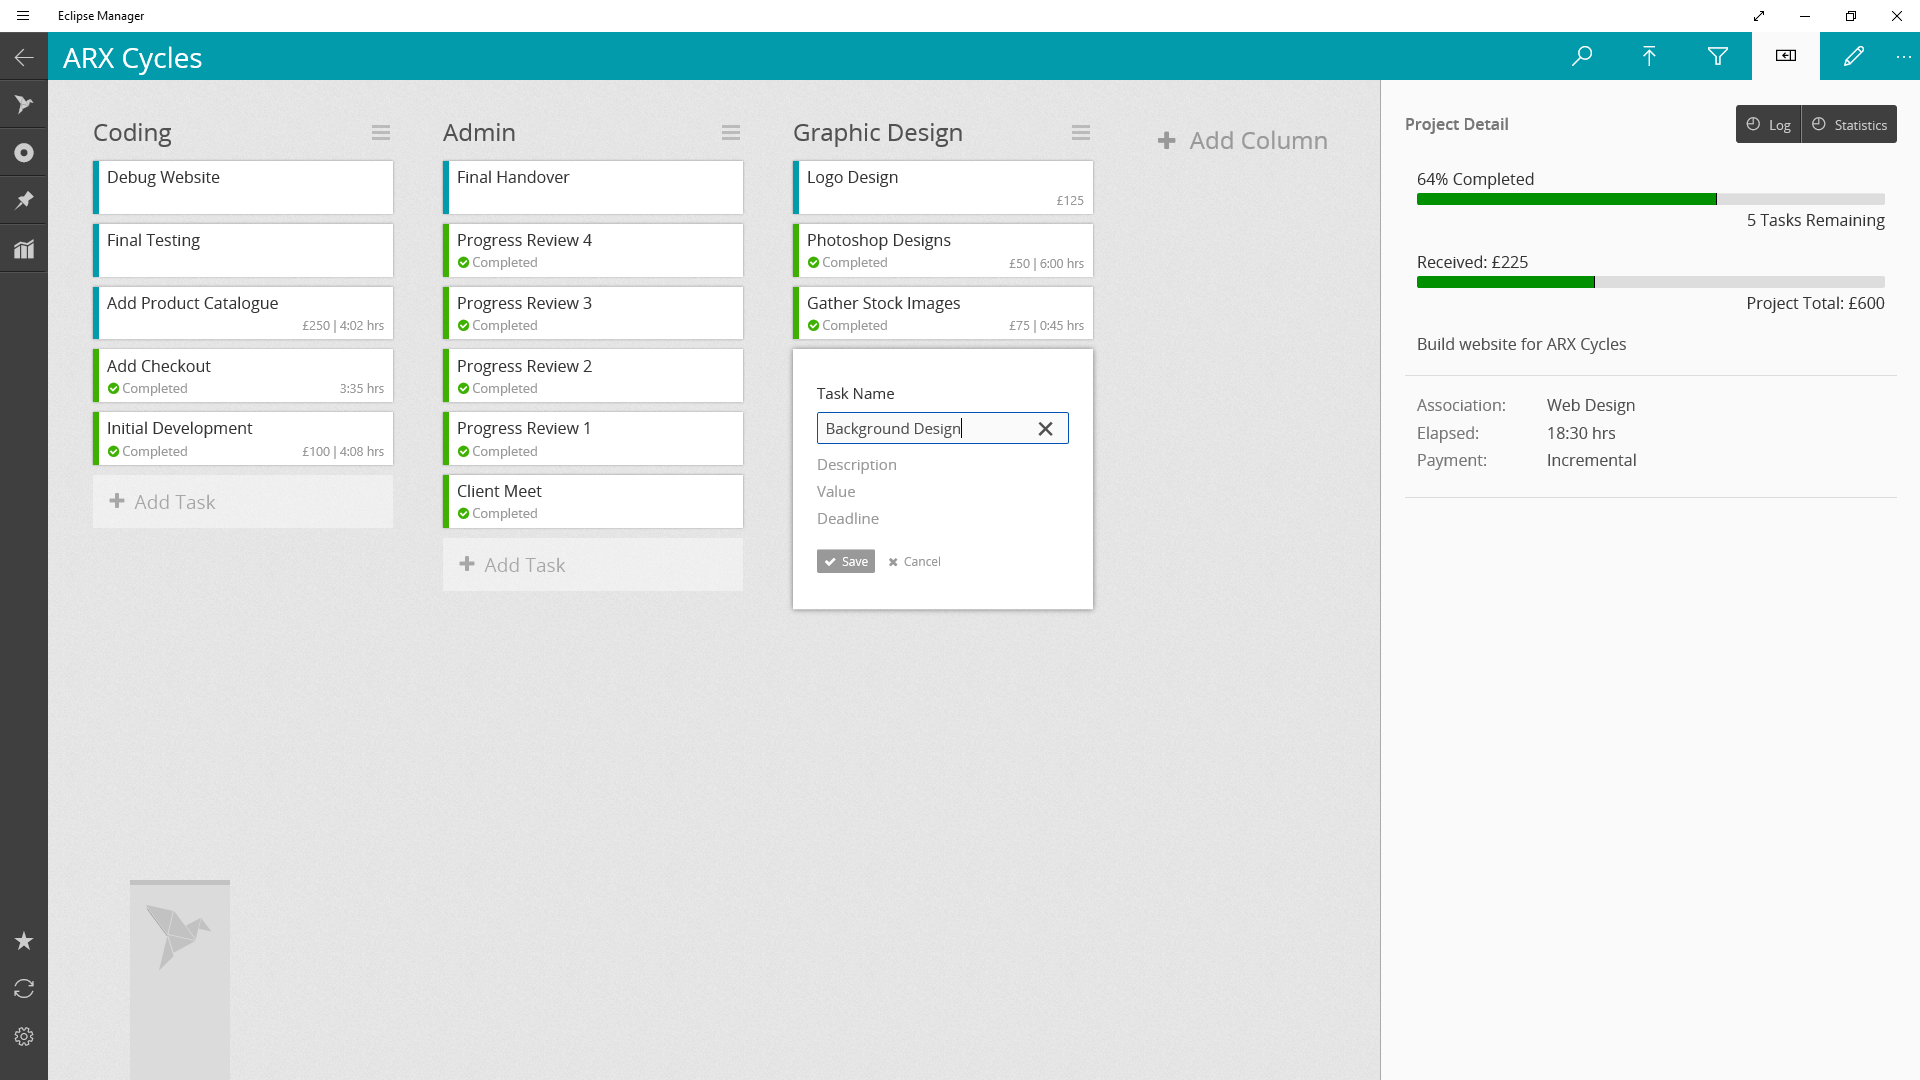
To add more information to the task or edit it, click on the newly created task. This will open the task in the Task Preview Panel. All properties of the tasks are edited by clicking on them in the Task Preview Panel - including its Name.
This is a rundown of the properties you can add to your tasks. Depending on how the project is setup will depend on what properties are available.
This is the name of your task. A good name is important as this is what will be displayed on the task card so aim for something succinct and distinguishable.
Here you can specify what the task is about and how it relates to the project. The description is the place to expand on the task name and include any additional information that you may have.
Rank determines the sort order for tasks which do not have deadlines and are not complete. Higher ranked tasks will appear above lower ranked tasks. These levels are: “High”, “Medium”, “Low”, “None” and “Ignore” rank. An icon on the task card on the page will indicate the rank (shown below).
The default rank is “None”, if this rank is selected tasks will be arranged based on when they were created. The final option “Ignore” will place tasks at the bottom of the Column below all other tasks, the user may also hide ignore ranked tasks with the project filter.
The rank allows you to quickly bring important tasks to your attention and keep less important tasks out of the way.
Tasks can be given a deadline , after this deadline passes the tasks will be labelled as overdue. Tasks given a deadline can be viewed on the “Timeline” part of the review page.
If tasks needs a list then the checklist is the perfect place. Checklists can be ticked off and rearranged so are very versatile. They are most commonly used to break down a task into some sub actions.
If you project has time tracking turned on then this property is available to keep track of the time spent on your project. The total time is broken into individual sessions. If you click on the total time it will take you to the timing log where you can manually edit the time.
If cost tracking is activated you will be able to assign a value for the task, this feature is only available to Eclipse Pro users.
Tasks have a number of actions that can be applied to them. Some of these actions can also be accessed by hovering over the task card.
When a task has been completed the user will mark a task as completed using this button. Completed tasks will go green and drop to the bottom of the column, they can also be hidden by the project filter.
This action will only appear in projects that have time tracking enabled. This button is used to start and stop a timing session. If you need to manually edit a session later, view the project log in the full screen task view and click on the session you want to edit.
If time tracking is not enabled it will instead show a “Stamp” option. This button is a quick way to mark activity on a task. This will then cause the task to appear in the “Recently Active” section of the review page.
This button allows you to move tasks between columns or projects. Don’t forget tasks can also be moved between columns in the same project by dragging and dropping.
This is in the top right hand corner of the project plan and can be used to remove a task that you no longer want.
This is in the top right hand corner of the project plan and can be used to remove a task that you no longer want.
When working in a project, tasks can be viewed in three different ways: as a card, in the project pane or full screen. Each subsequent view offers an increased perspective of the task in terms of information and options.
|
Cards |
Cards are the first view available of the tasks they are designed to give the user an easy preview of a task. |
|
Task Pane |
If you click on the task card, the task will be shown in more detail on the right hand side of the screen. This is the Task Pane, this shows the majority of task detail and has more actions available than if the task is viewed in Card format. |
|
Full Screen |
In the top right corner of the Task Pane there is an option to view the task in full screen. By entering into this mode maximum control is enabled – the user can view all available task information. |
Tasks are ranked within the project page by columns, effectively the same as “Associations” for projects, Columns allow tasks to be easily navigated and succinctly arranged. You can add a column via the “Add Column” button on the far right side of the page. When creating a new Task, you choose which Column you would like to categorise it in and then click the corresponding “Add Task” button. If you later wish to change the column your task occupies you can manually move it this is discussed below.
Tasks are organised into columns to keep them distinguished. Columns can be used in two ways, either to sub categorise tasks (Easy – Medium – Hard), or as part of a workflow (to-do – doing –done). To add a new column, click on the “Add Column” button to the far right of the tasks.
When managing multiple projects, it can be difficult to refer or navigate through tasks efficiently. For Eclipse Pro users these issues are addressed – the Review Page offers a place where tasks can be ranked, arranged and viewed regardless of the project they belong to facilitating a more dynamic system for working. The review page has 4 different views that can be utilised:
|
All Tasks |
The All Task view displays all tasks for all projects grouped together on one page under individual projects. |
|
Recent |
This view only displays tasks which the user has recently marked as active. Tasks can be marked as active in two ways – a user can either mark activity by switching on time tracking or by stamping a task. |
|
Rank |
This view will display all tasks across all projects which have been given a rank of either “Low”, “Medium” or “High”. |
|
Timeline |
This view displays tasks with upcoming deadlines, the deadline must have been previously set. |